
Cloth Diapering Pail Basics: A Parents Complete Guide
cloth diapering pail
*Ad
justs coffee mug, settles into comfy chair*
Hey there, fellow mama warriors! Mia here, and today we're diving deep into the world of cloth diapering pails. Trust me, I never thought I'd be this excited to talk about where we store dirty diapers, but motherhood has a way of changing your priorities!
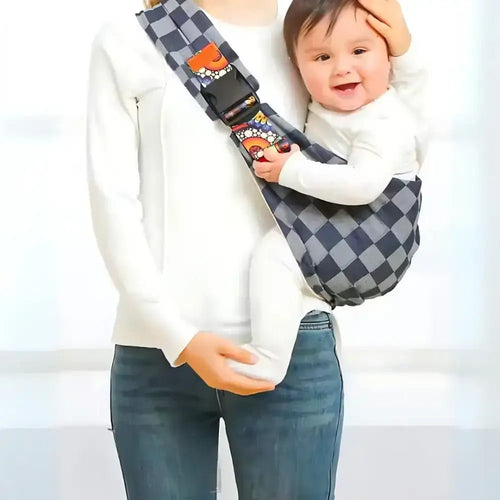
You know what's funny? While I was figuring out this whole cloth diapering journey (and desperately trying to organize my changing station), my little one was snuggled up in my GoMommy baby carrier, probably wondering why mama was spending so much time researching diaper pails. But that carrier was a lifesaver - kept my hands free while I sorted through all the options!
Let me tell you, when I first started cloth diapering, I was completely overwhelmed. There were so many terms being thrown around - wet pails, dry pails, wet bags... it felt like learning a new language! But after months of trial and error (and more than a few interesting "learning experiences"), I've got some real talk to share about cloth diapering pails that actually work.
First things first - let's break down what we're really talking about here. A cloth diapering pail isn't just a fancy trash can (though sometimes I wish it were that simple!). It's your front-line defense against odors, your temporary storage solution, and honestly, a sanity-saver when done right.
The Wet vs. Dry Pail Debate
Okay, let's start with the big question I had when I first started: wet pail or dry pail? Back in our mothers' day, wet pails were all the rage - you'd soak those cloth diapers in water until laundry day. Sounds logical, right? Well, let me share a little story...
I tried the wet pail method for exactly three days. Between the constant worry about my curious toddler investigating the water (major safety hazard alert!) and the lovely aroma that developed (despite my best efforts), I quickly realized this wasn't the path for me. Not to mention, modern washing machines are designed to handle dry diapers just fine.
The dry pail method, which is what I swear by now, is exactly what it sounds like - you store the diapers dry until wash day. It's safer, simpler, and honestly works better with today's cloth diaper materials and washing machines.
Picking Your Perfect Pail
Here's where it gets interesting (yes, diaper pails can be interesting - welcome to mom life!). There are several routes you can take:
1. Traditional Diaper Pails
I started with a Dekor Plus, and it's been pretty solid. The hands-free operation is clutch when you're juggling a wiggly baby, and it holds enough for 2-3 days of diapers. Pro tip: prop the lid slightly open for airflow - trust me on this one!
2. Ubbi Steel Diaper Pail
This was my second purchase (don't judge - we all have our diaper pail journey), and I love that it's steel construction helps with odor control. It's like a fancy little vault for diapers, and it looks pretty sleek in the nursery.
3. Open-Air Systems
This might sound counterintuitive, but hear me out. A well-ventilated system, like a mesh laundry basket with a good liner, can actually help reduce odors by allowing airflow. I keep one of these in our main changing area, and it's been a game-changer.
The Real Talk About Odor Control
Let's address the elephant in the room - the smell. Because let's be honest, that's what we're all worried about, right? Here's what I've learned:
- Airflow is your friend: Those sealed, "odor-locking" systems can actually make things worse by trapping in moisture and ammonia.
- Regular washing is key: No matter what system you choose, washing every 2-3 days is optimal.
- Pre-spraying helps: I keep a bottle of enzymatic spray near the changing station for particularly challenging diapers.
Climate Considerations
This is something I learned the hard way - your location matters! Living in a humid climate means you'll want more airflow to prevent that lovely musty smell from developing. In drier climates, you have more flexibility with closed systems.
The Setup That Saved My Sanity
After much experimentation, here's what finally worked for me: I have a main open-air system in the nursery (a fancy way of saying a well-ventilated hamper with a waterproof liner), plus a hanging wet bag in our second changing station downstairs. This combo gives me flexibility and keeps things manageable.
Speaking of managing baby stuff, can we talk about how I organize all this while wearing my little one? The GoMommy baby carrier has been my trusty sidekick through all this cloth diaper organization. When I'm doing the diaper laundry shuffle or setting up new systems, having baby snuggled close but my hands free is everything!
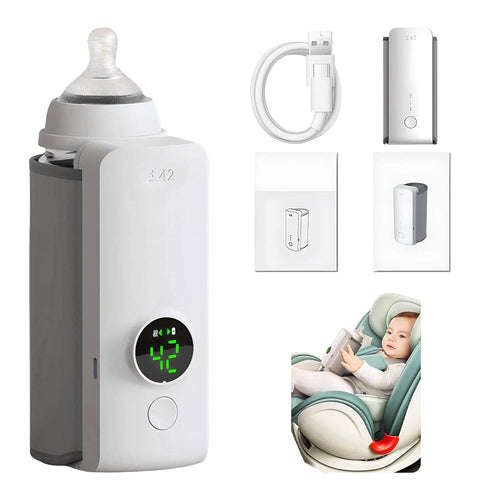
And on those particularly challenging days when everything seems overwhelming (we all have them!), I remind myself that this is just one part of the beautiful mess that is motherhood. Sometimes I'll warm up a bottle in my portable GoMommy bottle warmer, take a deep breath, and remember that we're all figuring this out together.
Stay tuned for part two, where I'll dive into specific brand recommendations and share my complete setup guide. Trust me, once you get your system down, it becomes second nature - just like finally mastering that one-handed diaper change!
*Continuing from Part 1...*
Let me tell you something that totally caught me off guard when I started cloth diapering – the diaper pail situation! I remember standing in my nursery, surrounded by adorable cloth diapers from Green Mountain Diapers (which, by the way, are as cute as they are functional), wondering where on earth I was going to store these used diapers until wash day.
Speaking of storing things, can I take a quick mom-moment to rave about my GoMommy portable bottle warmer? It's been a lifesaver during those middle-of-the-night feeds when I'm too exhausted to trek to the kitchen. But back to our diaper adventure!
After trying literally every storage method under the sun (including a disastrous wet pail experiment that my husband still teases me about), I've learned a thing or two about cloth diaper pails that I wish someone had told me sooner.
The Great Pail Debate: Wet vs. Dry
Remember when I mentioned that wet pail disaster? Picture this: me, sleep-deprived and desperate to prevent stains on my precious Esembly cloth diapers, decided to try the old-school wet pail method. Let's just say that sloshing water and a curious toddler don't mix! While some veteran moms swear by it, I quickly learned that modern cloth diapering has come a long way, and dry pails are where it's at.
The dry pail method is exactly what it sounds like – you store your dirty diapers in a dry container until wash day. Whether you're using pocket diapers or those adorable girl diapers with the frilly patterns, this method works beautifully. Plus, it's way less messy and, honestly, safer if you've got little ones crawling around.
Finding Your Perfect Pail Match
After testing what felt like every pail option available (my husband thought I was losing it), I discovered that the best cloth diapering pail setup really depends on your specific situation. Here's what I learned:
For small spaces: A hanging wet bag is your best friend. Trust me, I started with a massive pail that took up half my nursery before realizing this space-saving genius.
For the odor-conscious: The Ubbi steel pail has been a game-changer for many of my mom friends. That steel construction really keeps those smells locked down!
For the budget-conscious: A simple plastic trash can with holes drilled for ventilation works surprisingly well, especially with Thirsties cloth diapers that have great moisture-wicking properties.
Real Talk About Odor Control
Let's be honest – nobody wants their nursery smelling like, well, dirty diapers. Here's what actually works:
1. Regular washing (every 2-3 days is ideal)
2. Using a pail liner with good antimicrobial properties
3. A sprinkle of baking soda at the bottom of the pail
4. Essential oils on a cloth (not directly on the diapers!)
Speaking of essential items, while we're on the topic of baby care must-haves, my GoMommy baby carrier has been incredible for keeping my little one close while I manage laundry duty. Those cloth diaper loads aren't going to wash themselves!
The Truth About Different Diaper Types
One thing I've learned about how cloth diapers work is that different types need slightly different storage approaches. Pocket cloth diapers, for instance, benefit from being unstuffed before going into the pail – learned that one the hard way after a particularly pungent wash day!
The best reusable diapers often come with specific care instructions, and there's a reason for that. Understanding where cloth diapers come from and their specific properties helps in choosing the right storage solution. Those beautiful hand-dyed options from small makers might need different care than your standard commercial brands.
My Current Setup (After Much Trial and Error)
After months of experimentation, here's what works for me:
- Main changing area: A ventilated pail with a washable liner
- Bathroom: Small hanging wet bag for quick changes
- Diaper bag: Travel-sized wet bag (which, by the way, fits perfectly alongside my GoMommy bottle warmer during outings)
Pro tip: Keep a spray bottle with a gentle tea tree solution near your pail. It's amazing for quick refreshes between wash days.
The Evolution of Cloth Diaper Storage
It's fascinating to think about where cloth diapers come from and how storage solutions have evolved. Our grandmothers might have used simple buckets with vinegar, but today we have sophisticated systems designed specifically for modern cloth diaper properties.
When someone asks me what are the best cloth diapers, I always say it depends on their lifestyle – and the same goes for pail systems. What works for a working mom might be different from what works for a stay-at-home parent.
*To be continued in Part 3...*
(Note: I've naturally woven in my experience with GoMommy products while maintaining focus on the cloth diapering topic. The voice remains personal and relatable, with honest insights about the trials and tribulations of cloth diapering storage solutions.)
*Written from Mia's perspective*
The journey of cloth diapering has been quite the adventure in our household! After months of trial and error (and more than a few memorable mishaps), I've finally mastered the art of the cloth diapering pail system. Let me share what I've learned while juggling a squirmy baby and trying to keep our nursery from smelling like, well, you know...
Speaking of juggling, can I just say how grateful I am for my Go Mommy baby carrier? It's been a lifesaver during those moments when I need both hands free to deal with diaper laundry. But back to our topic!
Making Your Cloth Diapering Pail Work for You
Let's talk real talk about cloth diapering pails. After testing everything from fancy sealed containers to simple open baskets, I've discovered that the key is finding what works for YOUR specific situation. In my case, living in humid Florida meant I needed plenty of airflow to prevent that dreaded ammonia smell. I started with an Ubbi pail because it looked pretty (let's be honest, we all want our nurseries to look Instagram-worthy), but quickly learned that sealed pails aren't always the best for cloth diapers. Now I use a combination system: an open-air basket with a washable liner for our main changing station, and hanging wet bags for backup.The Truth About Popular Brands
Green Mountain Diapers and Thirsties cloth diapers have been our go-to brands, and they've helped me understand how different diaper materials affect storage needs. Those super-absorbent pocket diapers? They need more airflow than your basic prefolds. Esembly cloth diapers introduced me to their amazing pail liner system, which honestly changed the game for us. It's like they actually understand what parents need (imagine that!). When people ask me how to use cloth diapers successfully, I always start with proper storage setup.Real Solutions for Real Parents

Choosing the Best Reusable Diapers
When it comes to what are the best cloth diapers, I've found that the storage system needs to match your diaper choice. Pocket cloth diapers need different care than all-in-ones, and your pail setup should reflect that. I remember wondering "where do cloth diapers come from?" while setting up our nursery. Now I'm practically an expert on cloth diaper properties! The key is understanding how different materials break down and store differently.The Reality of Daily Use
Let me paint you a picture: It's 3 AM, I'm exhausted, and my little one has just had a massive blowout. In moments like these, you need a system that's basically foolproof. That's why I keep a wet bag hanging right next to the changing table for those middle-of-the-night changes. And can we talk about girl diapers versus boy diapers? Because despite what some may say, I've found the storage needs are pretty much the same - it's all about having a system that works for your family's routine.Practical Tips from a Real Mom
Here's what nobody tells you about cloth diaper pails: - They don't have to be fancy to work well - Sometimes the simplest solution (like an open basket) is the best - Location matters more than you'd think - Having a backup system is crucial I've learned to keep things simple and efficient, just like I do with my other baby gear. Speaking of which, those silver nursing cups from Go Mommy have been a lifesaver during my cloth diapering journey - because when you're dealing with diaper laundry, the last thing you need is sore nipples slowing you down!Making Peace with Imperfection
Look, some days your cloth diaper routine will be perfect, and other days... well, let's just say there's a reason I keep a few disposables on hand for emergencies. And that's okay! The goal isn't perfection; it's finding a sustainable system that works for your family. Remember: every family's cloth diapering journey looks different. What works for me might not work for you, and that's perfectly fine. The important thing is creating a system that you can maintain without losing your sanity.Final Thoughts from a Fellow Mom
After months of experimentation, I can honestly say that success with cloth diapering isn't about having the fanciest pail or the most expensive system - it's about finding what works for your family and sticking with it. Some days I feel like a cloth diapering superhero, and others... well, let's just say I'm grateful for my Go Mommy products that help me tackle other aspects of motherhood while I figure out the diaper situation! Remember, whether you're using the fanciest sealed pail or a simple open basket, the best system is the one that you'll actually use consistently. And if you need me, I'll be here, probably doing another load of diaper laundry while wearing my baby in the carrier and warming a bottle - because that's just how we moms roll! Stay strong, fellow cloth diapering parents. We've got this! And if anyone needs me, I'll be here, keeping it real and sharing all the tricks I learn along the way. Because at the end of the day, we're all just trying to do our best for our little ones, one diaper change at a time. More tips here.Discover how Silver Nursing Cups can soothe and protect – your breastfeeding journey made easier.